Citrix PVS Boot process options. (PXE and BDM)
Well, today I will talk about the different options to boot a target device with Citrix Provisioning Services.
Some options are batter then other, but all have pros and cons and I will explain about each one to help you determine what is better for your environment.
Citrix Provisioning Services is one of the greatest solution of Citrix (my opinion) and is not so difficult to understand. The simple description of what Citrix PVS is.
Citrix Provisioning Services is a solution to provision an image (read only state) to many targets simultaneously (can be virtual or physical) to provide and uniform environment. Also, reduce the time to provision new virtual machines. It´s working by streaming the VHD to a target through the network.
The target device may need to know from who will request the streaming of VHD, and to accomplish that, is needed a PXE or BMD configuration.
The Citrix PVS work with some types of boot options. (TFTP, PXE, Citrix ISO Image Recorder and Virtual HD)
I will talk about each one and it´s requirements and components involved.
TFTP
I think that is the most common in Citrix PVS environment and very easy to set up. We only need a DHCP Server and PVS Server.
The DHCP server must be configured with options 66 (boot server) and 67 (file name) and the Citrix PVS TFTP Service must me running on the PVS Server and the target startup must be setup to network device.
The option 66 define the boot server. (IP of PVS Server)
The option 67 define the filename that will receive by TFTP (ARDBP32.bin)
TFTP Installation and configuration
During the installation of Citrix PVS Server will ask to use the TFTP Service

If you want to change some TFTP configuration, you can re-run the PVS service configuration wizard.
Other useful tool is TFTP CPL on C:\Program Files\Citrix\Provisioning Services\tftpcpl.cpl. with this you can change the path of ardbp32.bin, enable logs and chose the network bind of TFTP Service.

For those environments that request a load balance can be easier accomplish with NetScaler. If you don´t have a NetScaler you can set up multiple IP from PVS TFTP Server on DHCP option 66 separated by a semicolon (if your DHCP support). Another think that you can keep in mind that you client must be able to interpret the option 66 with multiple entries.
The flow is like this. (After the TFTP Data Packet this flow was resumed)

Citrix PVS PXE Service
With this type of boot, you won´t need a DHCP with the option 66 and 67. This option can be initial configures when you run the Citrix PVS Configuration Wizard (or just enable the service on control panel > services)

With Citrix PXE built-in service the client during the startup, send broadcast requesting the option 60 (PXEClient) and all PVS Server that handle this service will answer this request and send the file called bootptab. The file bootptab make reference of ardbp32.bin file that contain the image file for the target device.
To view/edit the content of bootptab file you can use the Boottab Editor.
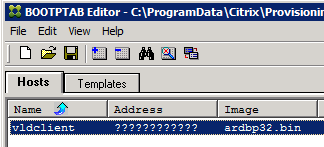
Address: ??????????? is a wildcard for MAC Address. It´s means that this file can be used on all client device. If you want to hard code the MAC address or limited to and range of environment, you can put the MAC address like this Eg: Limitating for HyperV: 00:15:5D
Image: ardbp32.bin (is an image for Target Device)
You can also open this file with notepad
This file should content the line like this
vldclient:ha=????????????:bf=ardbp32.bin:
where:
ha = Hardware address (MAC address for the client)
bf= bootfile
PXE tool
You can use the PXE tool to configure some option like Logs, Network Bind and Proxy DHCP.
The location is C:\Program Files\Citrix\Provisioning Services\BNPXE.cpl

The boot process flow is like this:
Load balancing for this type of boot process is really simple because when a target send broadcast searching for some dhcp, automatically all the PVS Server with PXE service enabled will respond the request with the boot file. So in case of environment with 2 PVS Server with PXE enabled and one of this servers goes down, the remain PVS Server will answer the dhcp request.
Citrix ISO Image Recorder
In this type don´t need a DHCP option 66 and 67. During the process to burn an ISO, you need to insert the IP or DNS Name of PVS Server, so the target already know the IP to get the boot file. This can easily combined with DNS to make load balance with round robin fashion.
It´s use the boot file TSBBDM.bin and the Citrix PVS Two-Stage Boot Services.

The Target Device must configured in BIOS startup through CD/DVD, so in virtual environments could be a bad solution because sometimes is we need to vmotion virtual machines, and if the virtual machine has and local ISO attached, this vmotion will fail.
the boot process flow is like this

Virtual HD
The Virtual HD act exact how ISO works. The process to burn the information on a virtual disk drive is diferent but equal easy.
To save the information on vhd you will need to add this vhd to a Provioning Server and then execute the Citrix Boot Device Management.
The process to create is:
1- Add a virtual disk on you PVS Server (the vhd can be very small. 100mb is recommended by Citrix)
2- Format and mark this disk with ACTIVE PARTITION

3- Open the Citrix Boot Device Management and enter the information about your PVS enviroment
4- Select your 10mb virtual disk to burn and click and Burn

Remember. If ask you to enter “Yes” to complete the process, you need enter exactly the the word Yes with the Y in lowercase.
5- After that you need to detach the vdisk of PVS Server and attach to your target device and set up a startup order to hard disk
Load Balancing with this option is the same with Citrix ISO Image
Citrix PVS BootP Service
This service in very useful if you cannot change your DHCP. This service is responsible to delivery IP to Target device acoording wit BootP Tab.
C:\Program Files\Citrix\Provisioning Services\BNBOOTP.cpl

An sample of bootptab file is below
# Sample BOOTPTAB file for Ardence BOOTP server for Windows 2000 and Windows XP.
#
# Blank lines and lines beginning with ‘#’ are ignored.
#
# Each entry in the file contains a name for the entry and a series of
# fields, seperated by a colon. Fields are defined by a two character
# “tag”, supported tags are:
#
# ha – hardware address
# ip – host IP addres IP address
# hd – home directory
# bf – bootfile
# bs – boot server IP address
# cs – cookie server IP address
# ds – domain name server IP address
# gw – gateway IP address
# hn – return host name
# dn – return host domain name
# im – impress server IP address
# lg – log server IP address
# lp – LPR server IP address
# sm – subnet mask
# tc – template host (points to similar host entry)
# to – time offset (seconds)
# ts – time servers
default:bf=ardbp32.bin:sm=255.255.255.0:to=3600:
client1:tc=default:ha=0020AFB322A7:ip=192.168.2.1:
client2:tc=default:ha=0020AFB322AC:ip=192.168.2.2:
client3:tc=default:ha=0020AFB322A8:ip=192.168.2.3:
Larry:tc=default:ha=0207010422A9:ip=192.168.2.4:


#1 by saadet on June 25, 2014 - 13:15
Great article, very useful when trying to run two xendesktop platform on same LAN (xendesktop 5.6 on xenserver and xendesktop 7.5 on vsphere platform)
#2 by jam tangan termahal on July 4, 2015 - 07:41
Hello mates, good paragraph and good arguments commented at this place, I am
genuinely enjoying by these.
#3 by Ravi Gunti on August 13, 2015 - 01:09
Hi.. That’s a pretty good explanation. Could you tell me the difference among steps 2,3 and 4 in PXE communication between Citrix PXE Service and Target Device.
#4 by Sebastian Trumstedt on November 9, 2015 - 09:19
Thanks for clarifying this in such an easy to follow way.
#5 by dhanoj pandey on August 10, 2016 - 19:27
very nice it very usefull
#6 by kannan pd on October 28, 2016 - 09:11
Superb article.. very down to earth explanation. From now, am your Fan 🙂
#7 by sbobet on December 28, 2016 - 23:19
Quality posts is the crucial to be a focus for the viewers to pay a quick visit the site, that’s what this web page is providing.
#8 by Ranjith on August 3, 2018 - 09:08
it is soooo…clear and useful….thx for this article